

Build & Create

This wall is small, but one of my favorites because it was created with E’s love for engineering in mind. My boys love to build and create new things, so I knew we should have a wall dedicated to this. Our goal is to let our boys find a variety of tools to build whatever they can imagine. Each type of tool has a bin and is labeled (again, with the Minted labels) so they know right where everything should be returned to when they are finished.
The table area gives the boys a flat surface for building on, while encouraging them to “build a scene” with their toy dinosaurs and animals. Since I can’t stop working on this room, even though it’s “finished”, I have one more thing I am working to add to this section too. It’s a surprise!

If you’re wondering what that nifty orange thing is under the table…that’s a Trunki. It’s a multitasking suitcase (yippee!) that can be used for storage or for sitting on and riding, which would have been what my toddler planned to use it for anyway.
You might recognize this fishbowl and net from our Ocean-Themed Birthday Party. I decided that it would make a great addition to the playroom. Since I don’t trust having an actual pet in here, as they play in there alone a lot and my toddler enjoys dumping water out of bowls, the plastic container with leftover toy fish from our party was a great solution. My toddler loves scooping the fish out with the net and telling me the colors. We are working on counting with this as well and it is a great fine motor activity.
We purchased the nifty shelf underneath from Hobby Lobby on clearance. It was multi-color, but we painted it white to match everything else. The drawers were the perfect size and they flip out rather than pull out, so Mr. Toddler cannot dump them…which he would do if he could.

As mentioned above, each of these bins is labeled based off of what is inside. We have blocks, LEGOs (the DUPLO bricks, many from our LEGO Education set–we put the instruction pages into a binder to keep them all together and placed it next to the shelf), puzzles, tracks, fort supplies, and logs (Lincoln Logs, of course).
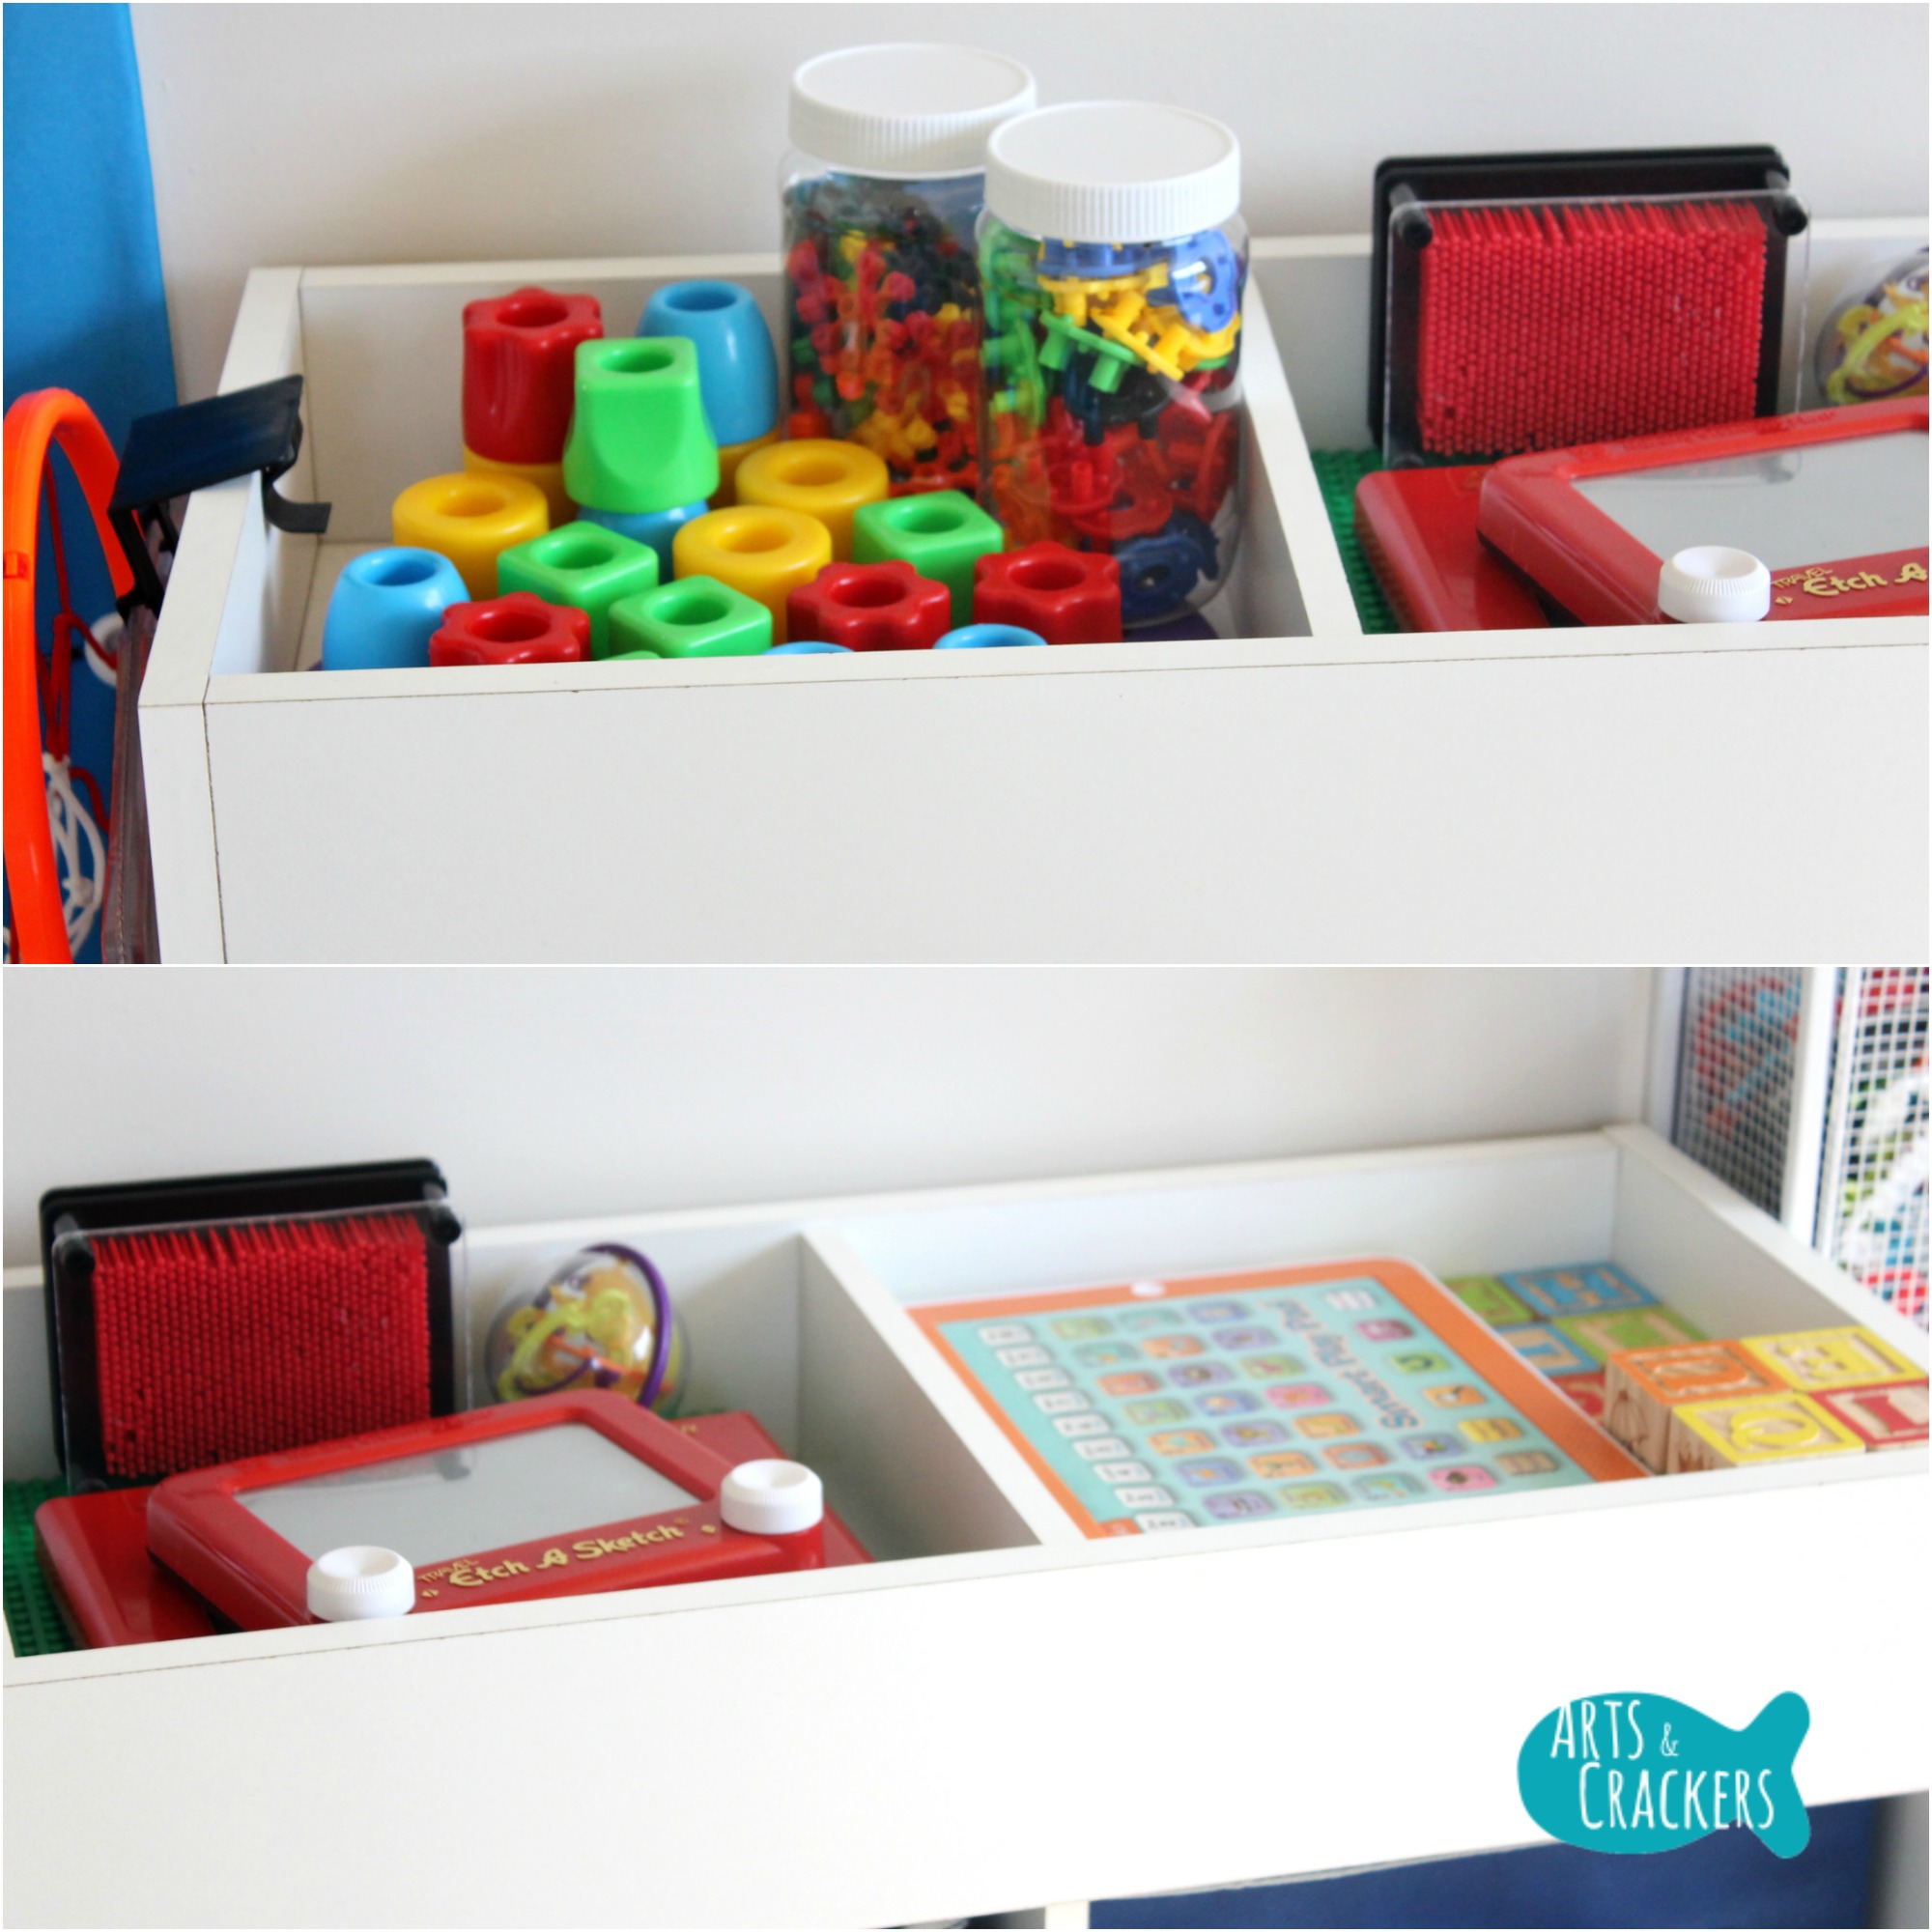
Some were asking which shelves and bins we used in the playroom. We used a cube organizer (similar to this one, but a neat one we found in stores) with basic fabric cube bins like these.

On the top, I decided instead of putting more bins I would add small amounts of tools they can use. This may not be very basic or organized, as I theoretically should have only one thing per bin, but I still enjoy how we have this set up. This is where we put a bunch of the math toys, extra blocks (yes, we have that many), and just plain fun toys like the Etch-a-Sketch.
We had some extra space where we couldn’t put shelves or anything, because of the door, so I moved their felt map that used to be on the wall above the bed over to here with the felt labels in a small basket nearby. Now it is still at a level they can reach (without standing on the bed).

Across from the map, I hung a frame that had a chart of the alphabet in sign language (we got it in one of the magazines the boys received.). I love sign language and teach them what I can, so this is a great visual for them. It has the alphabet listed on it as well, so E copies the pictures with his hands to try sign language while pointing out what each letter is to his little brother. Tip: when possible, use plastic frames rather than glass if it will be at your child’s level. Another precautionary measure I take, so the boys can’t rip it off the wall and hit each other with it or step on it, is to add a little mounting tape to the bottom of the frame (the kind that can be removed if needed) so they can’t pull it up.

Little Home

THIS WALL IS MY FAVORITE!!!
That’s right. I love the other walls in the playroom, but this wall is my favorite. Part of the reason could be that it took the most time, as some of these projects we labored over for over a year due to busy schedules, but also because there is so much wonderfulness on this wall. It really is like a mini home! We have a kitchen, dining area, laundry room, and dress-up area.
The kitchen turned out to be so cute!!! This was the Kidkraft kitchen we reviewed (read the post to see how we organized everything and view the “before” pictures.). While I didn’t mind it in the pastel pinks and yellows it was before, because colors are colors, I really wanted to give it a face lift to make it match the room and give it a little more character. How did we do it? Stick around for the tutorial.

Above the kitchen, I wanted to add something that hung from the ceiling. I made some pendant lights using plastic cups, battery-powered tealights, fishing line, and this nifty UV glue called Bondic (which is seriously my favorite glue of all now). To make the lights, I used a stick lighter to *carefully*, repeat carefully, CAREFULLY melt a small hole in the bottom middle of the plastic party cups. I did not hold the flame right up against it, but near it enough that it was hot enough to melt the plastic. I melted it just enough that the tealight top would fit through the hole then I used the fancy glue to attach the tealight to the bottom of the cup. I attached the fishing line by looping it through the battery compartment and replacing the lid then tying the ends and gluing it in place.
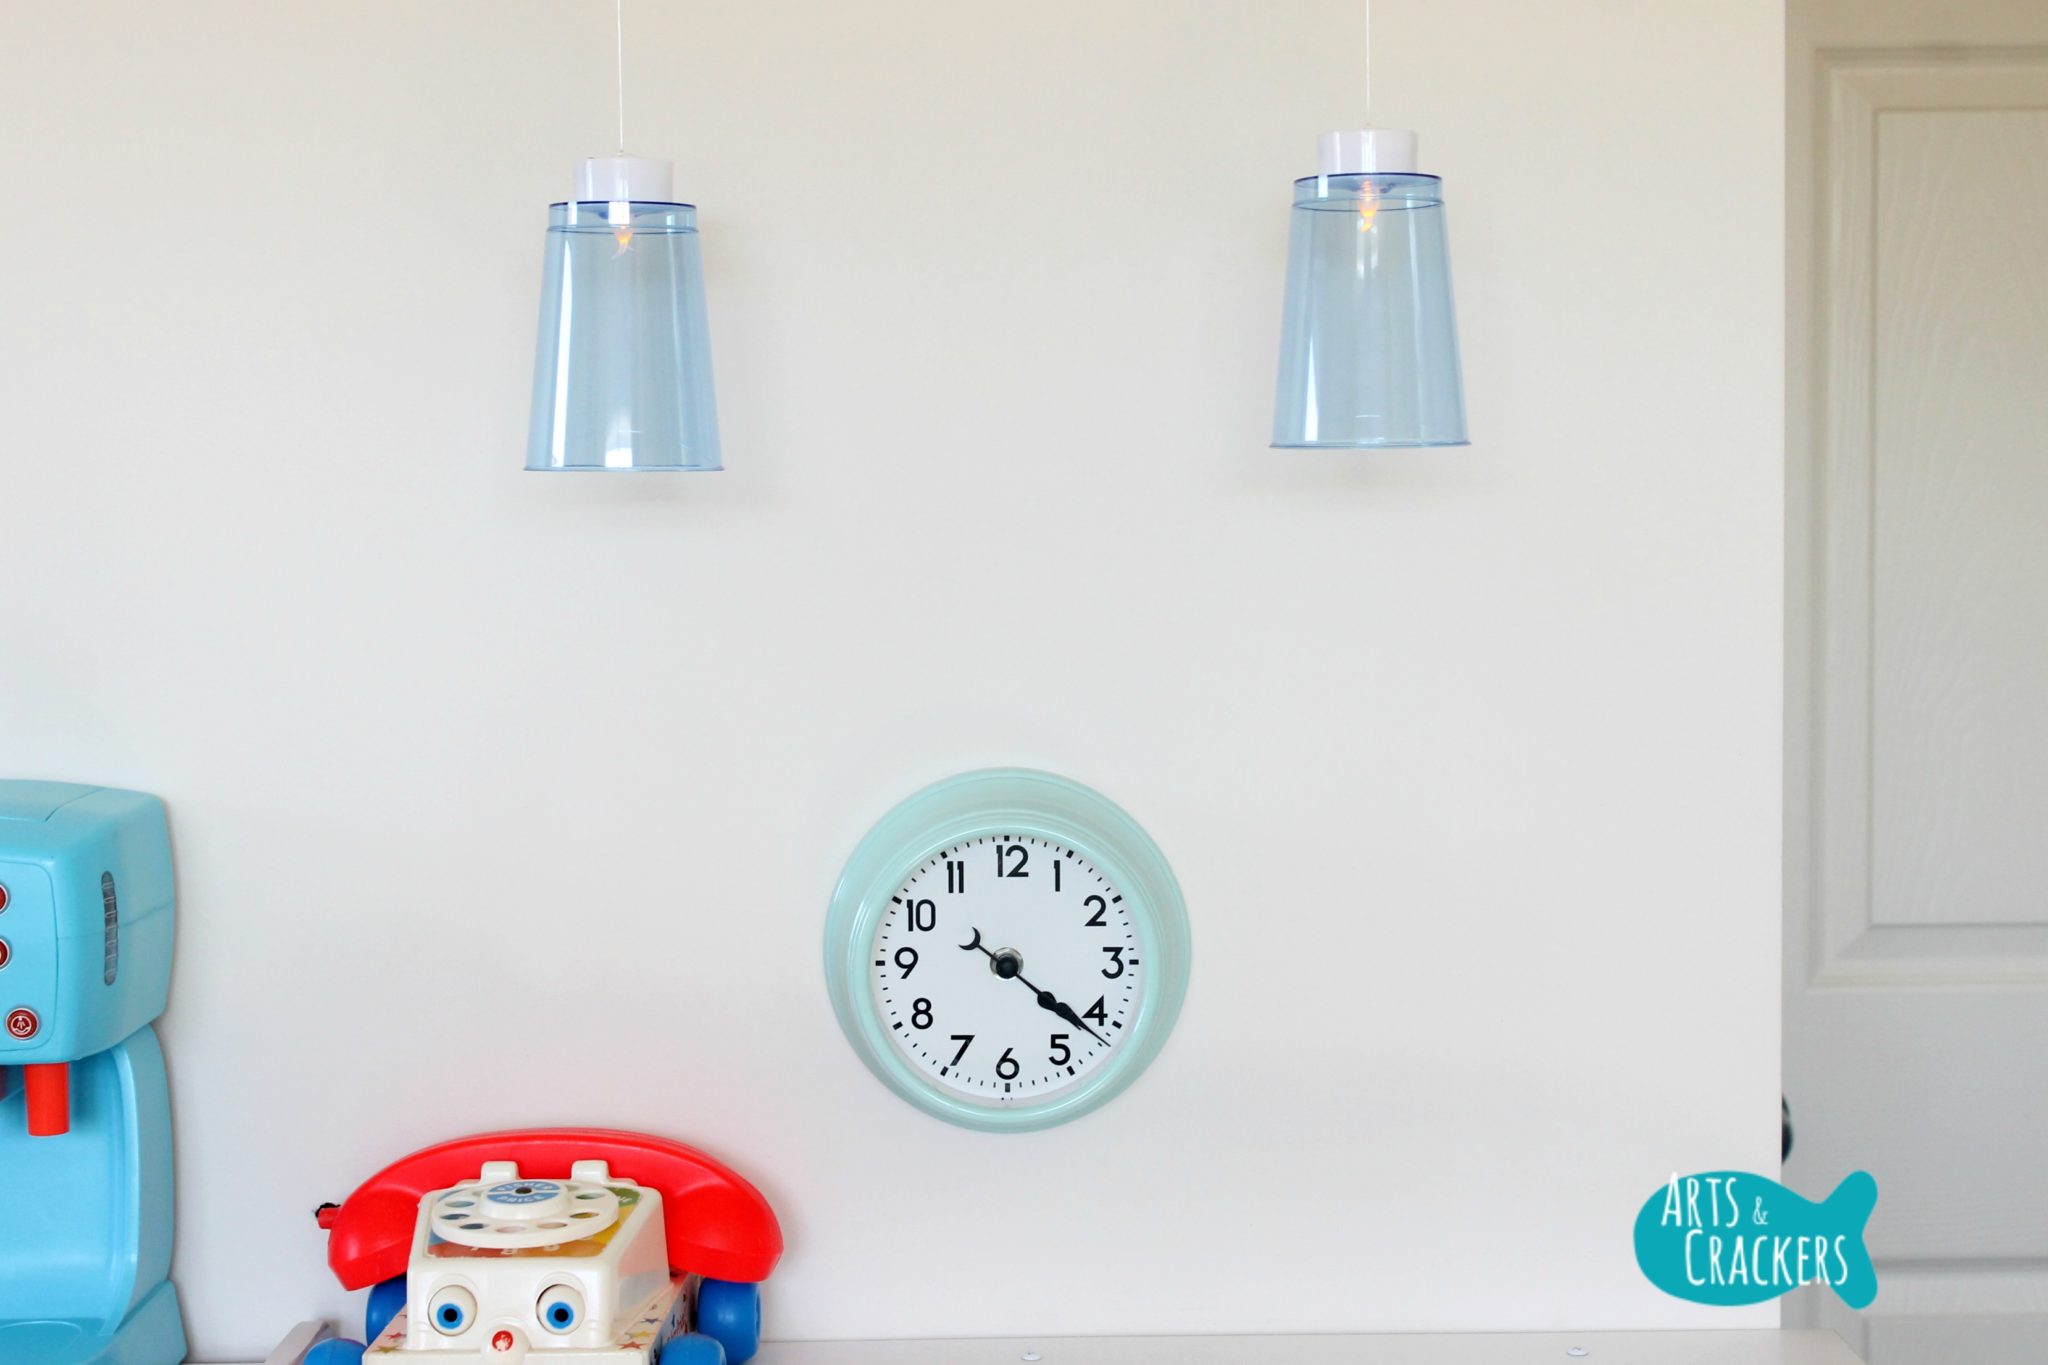
I wanted the boys to have a clock in the playroom, both for learning how to read clocks and to pay attention to time, so I found this small wall clock that matched the color scheme perfectly and hung it above the kitchen.

This table and chairs used to be primary colors. Actually, the original table leg broke and we found out someone was getting rid of a dented, sticker-covered one near our house, so we picked it up and gave it a new top and gave the table and chairs a fresh coat of white spray paint. Make sure the paint completely dries before putting in the room and that it has not been stored in a super hot space during the drying process (aka in the summer heat) because it will not dry and will end up tacky and your kids will end up with painted pants.
I used a couple entry mats as the rugs beneath the table to break up the monotonous carpeting and add some more texture. I may or may not paint a design on these in the future. Right now I am liking them as they are–simple.

If I had to choose my very favorite part of this room, it would be the washer and dryer. Wait until you see what it used to be! This project was the one that has taken us over a year, not because it’s really that much work, but because it had to get put on the back burner a lot. I am so happy it is finally finished and so pleased with how it turned out. The tutorial on this one might take a bit; due to the amount of time it took to complete this project, many of my initial in-process pictures are on my old computer that crashed. When I get a chance, I am going to work to get those pictures onto my new computer, as the added visuals help a lot in my tutorial posts.

Our laundry room has a window, so I decided it would be fitting that our boys’ play laundry room had one too. This window was totally made by me and the curtains did not even require sewing. You guessed it, I have a tutorial for that as well! We anchored in a shelf below the window to make a place for the play iron and the bottle of detergent (which was actually a travel bottle we purchased, emptied, thoroughly washed, and glued shut). I gave them a small spray bottle to use as well, but it is not pictured. Next to the window, I screwed a hook into the wall and gave them a Swiffer duster, because they love them and they dust the room without realizing they are actually cleaning. Points. Scored.
That Swiffer Duster is a great gift idea for kids. It’s listed on my Unconventional Easter Basket Fillers post which is also a wonderful reference year-round for other holidays, like Christmas, and birthdays!

The kitchen is right up against the laundry set, so I used the side of the play kitchen to hang a sock catcher I made (in hopes they will hang their socks there and find matches, since most socks disappear in the rooms with toys) and I moved the chalkboard that was originally on the freezer over to this side as well.

My boys love using their imaginations and dressing up, so we organized their play clothes into a dress-up area. We could have put these in the closet, but I preferred they be out where they would get more use. Since we didn’t have a wardrobe to put them in, we came up with a quick and inexpensive solution by anchoring in a shelf and offering a curtain to hide it from view to keep the room from feeling too cluttered. Definitely anchor down those shelves. My toddler uses this as a pull-up and swinging bar–great for exercise, but it would be dangerous if it was not properly anchored into the wall.
We hung the outfits, put hooks on the wall for some of the accessories and put the rest into bins, and stacked the big hats on top or hung them on the hooks and the rest we put into the “hat box” beneath the shelf (this is the hat box we have.). The smaller accessories are placed within E’s reach, but out of S’s, so Mr. Toddler doesn’t go dumping the bins all over, as he is so fond of doing. I absolutely love when they use the dress up area. I loved dressing up as a child, so it brings me so much joy to watch them “turn into” firefighters, postal workers, and pilots.
Check out our Mailman Dress-Up Activity and our Pilot Dress-Up and Learn Activity.

Ah, the curtain. I love this part. Did you notice that we took the curtains off the windows? We took the blinds off too. S, being the curious toddler he is, has broken multiple cheap curtain rods by pulling on the curtains (yes, he broke metal curtain rods) and would play with the blind cords (sooooo scary) even when I would hang them up high–I really have no clue how he would always get them back down. I did not want to fuss with that anymore, for safety and sanity purposes, so we removed them. It also lets in so much more light now, which I love, and our current curtain set up is far sturdier than before.

We were in the home improvement store brainstorming how we would make this possible. Initially I was thinking of purchasing a curved shower rod, but that would not have fit where we needed it. We brainstormed with an employee whose response was just “everything has been done–I bet you’ll find it on Pinterest.” I get why he would say that, and maybe it has been done before, but I needed this to be mine. I want to be the one posting it on Pinterest for others. That’s when the idea to do it this way hit me, and it works beautifully and was so, so quick to put together. I will share step-by-step instructions with you soon.
The curtain easily slides back and forth. It can be “put away” against the wall, pulled out enough to cover the dress-up area, pulled to the middle of the room to block light or just because, or pulled all the way out to the middle so it just hangs in the center of the room. I am not sure why we would leave it hanging it in the middle of the room without it covering anything, but it can do it if ever we feel the need to pointlessly leave it hanging there. The curtain we used is one we received from Budget Blinds (read our review post.). Originally I wanted a silk one with tabs, so it was lighter weight and I thought it would slide around okay, but it would barely move when we pulled from the boys’ level because there was not enough space between the metal and the fabric; we ended up using the extra linen one with grommets that we had received on accident and they told us to keep. I’d still prefer the silk for fabric weight, but I definitely recommend going with grommets so it slides smoothly and with ease.
The playroom curtain is meant to add “privacy” to the dress-up area. Yes, I know the dress up area is directly in front of an curtain-less, blind-less window. When the boys play dress up I require them to keep their outfits on, so they will not actually be taking all their clothes off in front of a window. That would just be awkward.

The great thing about this playroom is that most of the work we did to it will be easily transported, so we can recreate something similar in different spaces which is perfect if we do get to move. While you may not want to completely grab this playroom design and create it in your own home, I hope it gives you some fun ideas for projects to work on, things to include in the playroom, and ways to organize it. Remember those terrible “before” pictures? How would you like to hear how we were able to get it cleaned up quickly and organized? I am thinking I should make a post with that too… All these great posts I need to work on–it will take me some time to complete them all, but I am putting them on my schedule and hope you enjoy each!
The boys have been enjoying their playroom for a little bit now. While it has not stayed clean every day and some days gets very dirty (and my toddler may have already taken a few things apart…easy fixes), it has really been a great place for them to imagine, explore, create, and learn together and they have a much easier time cleaning up without my help than they did before–though let’s be honest…nothing gets cleaned up unless I’m sitting in the doorway reminding them every few minutes, with the exception of the first couple days when they *surprisingly* put everything away after they finished playing, without being prompted. Boy was that nice.
In the meantime, I have been treated to sleeping in some while the boys played quietly in their playroom instead of waking me up bright and early and have relished frequent short, sometimes even lengthy breaks where I am able to get a few things done in peace and quiet while the boys play together in the room.
I really hope you have enjoyed this playroom makeover as I do, and I hope you leave this post feeling inspired. Don’t forget to subscribe to my newsletter so you can stay up-to-date with my posts!
Feel free to watch this video of their first experiences with the playroom!
Do you have an awesome playroom? What is your favorite part of this playroom? Anything you think I should add? Have any questions for me? Share with me in the comments below!
Read Also: 8 Quick Tips to Transform Your Home Decor and Decorating Tips-LEGO Wall

Sign up for my newsletter!
Know someone who would love this? Hit the “share” buttons below! Be sure to follow Arts & Crackers on Facebook, Twitter, Pinterest, Instagram, or the others at the top right!


Alyssa, this is beautifulL! You have SKILLS!
Why, thank you, Menucha 🙂
I want to get that fabric world map so bad! My kids (specifically my older son) would love it! Great job on the makeover. It looks awesome!
It’s so fun! Look for it around Christmas. We found it cheaper that time of year and purchased it.
The playroom is amazing! I think you brightened it up and made it look so clean and organized. Such a fun place to play in now!
Thank you, Julie!
I love the pendant lights in the kitchen, the window in the laundry room, the washer and dryer, the farmers market… I could go on and on. Makes me wish my children were younger so I could do this! Do you do pre-teen room makeovers? LOL You are very talented and this room is absolutely beautiful! I hope your boys know how blessed they are to have you as their mom!
Thank you so much, Tara <3 I sure can do pre-teen room makeovers 😉
What a fun space. I love the apple tree and the clouds. I’m sure the kids are loving it!
Thank you, Jodie!
Incredible! Wow, I need this done in my kids toy room upstairs. Way to go, Fabulous work!
Thank you, James. This room was actually pretty easy to pull together, besides my need to redo the kids’ play furniture. Having everything organized and clearly labeled helps a lot!
Alyssa – you did an incredible job on this play room! I seriously want to come play with the kids in the room! I love how bright and open the space is and all the awesome and unique touches you did!!
Aw, thank you, Sarah. It was a lot of work for how much we did, but I absolutely love how it turned out.
What an amazing transformation! You did a great job and had so many great ideas!
Thank you, Shelly. I am happy it is done and I love how it turned out.
This room looks great! Love it!
Thank you, Elena
What a transformation! I love how bright it is now. Great job!
That looks amazing. It’s so bright and inviting! Love it! 🙂